Introduction
Reading a Pick-up Weaving Pattern
Pick-up Weaving Set-ups
Horizontal Stripe
Basketweave
Pick Up Inkle Weaving
Introduction
Ages ago I printed off the instructions for pick-up patterns off www.Inkleweaving.com. While it was hard to understand, I did manage to wrap my head around it, and so could any other competent weaver, however as the instructions themselves are now gone, this is no longer possible. I am not sure why the instructions were replaced with a basic description and the direction to go buy a book, but I don't think that serves the weaving community well. Thus, I present my version of the directions for pick-up inkle weaving, making my best effort not to infringe on the original author's copyright (ie written by memory of the technique, not by looking at the source documents). Please let me know if they are easy to follow or not.
Please note, this tutorial assumes you already know all about inkle weaving, from setting up looms and reading patterns to actually doing the weaving. If you don't know, there are lots of sites out there, including www.Inkleweaving.com that can help you with this information.
The basic theory of pick-up inkle weaving is that one uses warp floats to create a pattern. Warp floats occur when a warp thread, instead of switching sheds like the rest of the threads, stays where it is until the other threads come back to meet it. As the name implies, it floats over the rest of the weaving. The other implication of the float, is that a float can only begin or end in the natural shed for that thread. In other words, all floats are uneven numbered in length. As floats are floating above the weaving, like brocading (which uses weft floats, and which is described somewhere else on my site), there is a limit to how long you can make them. If you make a float too long, it will catch and snag and the weaving will be ruined. This is especially true if you intend to wear the piece. The appropriate length for a float is generally determined by the width of the threads you work with, but a good general rule is to never make a float longer than 5. You may get away with 7 depending on the thread, but don't count on it. Floats of 3 are ideal.
Additionally, to get a clear pattern, the pattern threads (those warp threads that will be making the floats) are generally either thicker thread, or multiple threads of the same type as the background. I usually use crochet cotton for my weavings and I have found success both by using triple strings of crochet cotton and by using a thicker cotton yarn. The thicker cotton warps up more quickly, but I think I preferred the outcome with the tripled crochet threads. To start, use a thicker thread for your pattern thread rather than multiples of a thinner thread. Just trust me on this one.
In order to get floats, as the name "pick up weaving" implies, you're going to have to pick up
and/or drop individual threads in each row you weave. While this makes interesting patterns,
it is time consuming. I expect pick-up inkle weaving takes 2-3 times longer to complete than
standard inkle weaving, though I have never actually timed the difference. I think it is well
worth the effort and I think the act of having to count out every row makes the weaving process
more interesting, but there are others who don't have the patience for it. Give it a shot and
if it bores you to tears, by all means, go back to standard inkle weaving. Any hand-work is
still a million times better than buying commercial trim :) And besides, I have no documentation
to prove this was done in period anyway, I just think it looks cool.
Pick up inkle patterns are unique in that they indicate what kind of set up you need to warp,
but they don't tell you explicitly. Instead, they are telling you what to do while you are weaving.
The secret to reading a pick-up pattern is to realize that it only indicates the pattern threads.
Black (or otherwise coloured) squares indicate that thread is on the top of the weaving while
white (or uncoloured) squares indicate the thread is on the bottom.
If this makes no sense at all, keep reading and I'm sure it will all come clear.
There are two different warping patterns (that I know of) for doing pick-up inkle weaving.
Which warping set-up you pick will depend on what kind of pattern you wish to
create. Generally, horizontal lines use the "horizontal stripe" set-up while diagonal lines
require the "basketweave" set-up. This is what I meant when I said the pattern implies the
warping pattern but doesn't explicitly tell you how to set up your loom. Examples of each type
of pattern are included in the sections on horizontal stripe and basketweave set-ups .
The "horizontal stripe" set-up is easier to warp than the "basketweave" set-up, but
the technique for weaving is the same.
This is the simplest set-up to warp. Give yourself a border of your background colour,
now simply alternate your threading using one background thread and one pattern thread. You
should have all your pattern threads in the open positions and all your background threads in
the heddle positions. Make sure you have the same number of pattern threads as there are
columns (counted left to right) in your pattern. The number of rows (counted top to bottom)
is irrelevant. Warp your background colour border on the other side and you're ready to go.
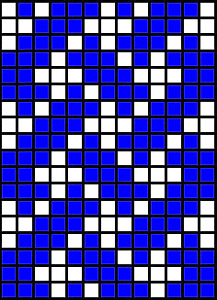
For example, this is the set-up you would need for this pattern:
Note that in this pattern there are 6 columns and the repeat is 10. The repeat (number
of rows) is irrelevant, but the number of columns is vital for the set up.
Your borders in this example will be nearly as wide as the pattern itself. The basketweave set-up is a little harder for people to wrap their heads around.
Start by warping a border of your backgrounds threads. Now, warp a single pattern thread.
Next, warp two background threads. Continue alternating one pattern thread and two background
threads until you have a sufficient number of pattern threads. Again, the number of pattern
threads should be equal to the number of columns in the pattern. Warp your border of background
threads and you're ready to weave. For the middle section, you should see your pattern threads
alternating between open and heddle. When woven using the regular technique it will create a
kind of honeycomb, brickwork or basketweave look. To me, it looks like honeycombs.
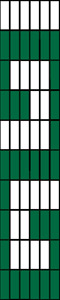
For those of you to whom that was clear as mud, here's a sample pattern and the warp
set-up required to weave it:
Note that I warp things backwards to the inkleweaving.com site. I do the open row before the
heddle row. That way if my pattern is an odd number of threads (like this one is) I get to
warp one less fussy heddle row.
Note that in this pattern there are 13 columns and the repeat is 6 (I have pictured
3 repeats so you get an idea what the pattern will look like woven). The repeat (number
of rows) is irrelevant, but the number of columns is vital for the set up.
I have used B as my pattern threads, and if you count them up, you'll find there are 13 of
them, equal to the number of columns in the pattern.
Now we get to the hard part :)
Start by weaving a few rows just like you would in standard inkle weaving. The object
here is to get your band started and stabilized. No point in wasting valuable pick-up time
at this stage. Once you have your band fairly even you can start on the first row of your
pattern. You can read the pattern top to bottom or bottom to top, it doesn't matter. Personally,
I like bottom to top since the weaving is working up that direction, so the pattern and the band
will look identical if you're doing it right. For the purpose of this tutorial, let's warp up the
S pattern pictured above in the "horizontal stripe set-up" section and read bottom to top and
counting the threads left to right.
Picking up is accomplished by creating an opening where the thread you want to manipulate is
and then either pulling it up or pushing it down. To do this, hold the threads in the top of
the shed that are to the left of the opening in your left hand and the top shed threads to the
right of the desired opening in your right hand. Use one finger (from your dominant hand) to
manipulate the thread either bringing it up to join the other top shed threads in that hand or
dropping it from that hand (and not picking it up with the other hand).
Only pattern threads will be manipulated. The background colour threads just work their way
merrily along as if they were a part of a standard inkle woven piece. If you get "floats" in
your background threads you're doing something wrong.
Start working your pattern with the shed open such that the open threads are on top and the
heddle threads are on the bottom.
Line 1: This line requires no adjustments, weave as normal. Repeat.
That's it, that's all there is to it.
Okay, I lied, that's not quite it. With the horizontal stripe patterns it's pretty easy to see
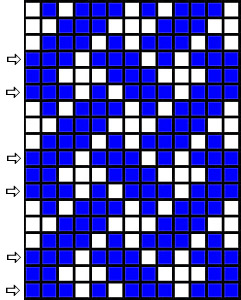
where to start. With the basketweave patterns it's a little trickier. Here's the secret to
figuring out where to start. Only look at pattern column (pattern thread) #1. Pick your start
point at the beginning of a float, where the first pattern thread is in its natural shed. That
means you can start at either end of a vertical black (coloured) stripe, but don't start in the
middle. Now, you can only do this line on your weaving if your first pattern thread is on top
in its natural shed. So if your first pattern thread is in the "open" row, the "open" row needs
to be above the heddle row. The illustration below shows all the possible start points for this
pattern. Note that I have pictured three repeats so there are really only two places you can start,
and I'd recommend the bottom arrow.
The truth is that once you know what you're doing you can start anywhere,
but as you're just beginning, take my advice on start points :)
If this is all clear as mud, feel free to contact me
with any questions you may have.
Go on to my inkle weaving patterns.
Return to my home
Reading a Pick-up Weaving Pattern
Pick up Weaving Set-ups
The Horizontal Stripe Set-up
O   WWWWWBBBBBBWWWWW   16
H   WWWWWWWWWWWWWWWW   16
The Basketweave Set-up
O   WWWWWWBWWBWWBWWBWWBWWBWWBWWWWWW   31
H   WWWWWWWBWWBWWBWWBWWBWWBWWWWWWW    30
Pick up Inkle Weaving
Line 2: Switch your shed, pushing all the pattern (open) threads to the bottom. Pick up the first and last pattern threads (first and sixth). Pass your weft.
Line 3: Switch your shed, pushing all the pattern (open) threads to the top. Push down the second and third pattern threads. Pass your weft.
Line 4: Switch your shed, pushing all the pattern (open) threads to the bottom. Pick up the first pattern thread. Pass your weft.
Line 5: This line requires no adjustments, weave as normal.
Line 6: Switch your shed, pushing all the pattern (open) threads to the bottom. Pick up the last (sixth) pattern thread. Pass your weft.
Line 7: Switch your shed, pushing all the pattern (open) threads to the top. Push down the fourth and fifth pattern threads. Pass your weft.
Line 8: Switch your shed, pushing all the pattern (open) threads to the bottom. Pick up the first and last pattern threads (first and sixth). Pass your weft.
Line 9: This line requires no adjustments, weave as normal.
Line 10: This line requires no adjustments, weave as normal.